Viewing files
Peach Commander has a built-in viewer that lets you look inside a file without opening another app or changing the file. Press F3 on the item under the cursor and the viewer opens instantly, even for very large files. It automatically chooses the best way to show the content: readable text, syntax-colored code, a raw hex dump, or a full-size image. You can also preview a file right inside the window using Quick View, or hand it to macOS Quick Look.
View a file
- Move the cursor onto a file in the active panel.
- Press F3 (or choose View in the File menu). The viewer opens in its own window.
- Use the toolbar to switch how the content is shown: Text, Code, Hex, Image, or Rendered. Leave it on the automatic setting to let Peach Commander decide.
- Scroll with the arrow keys, Page Up/Page Down, and the scroll bar. For long text, turn on the minimap button to see and jump around the whole file at a glance.
- Press N to jump to the next selected file, or close the window with Esc.
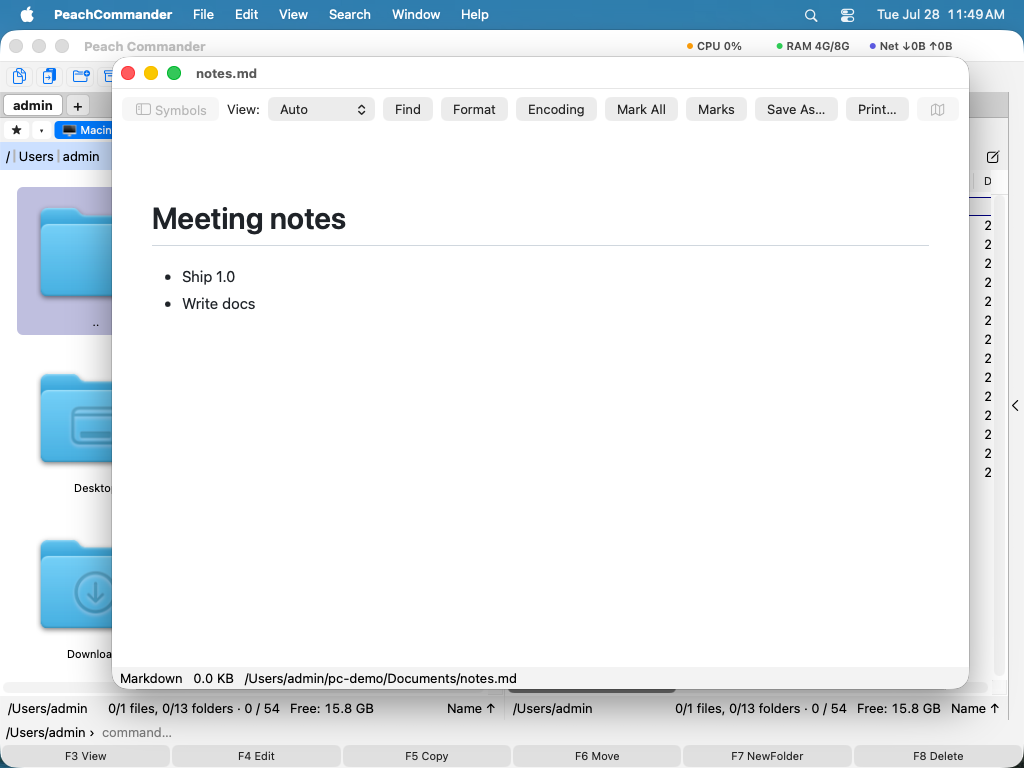 (Figure: Viewing a text file, with the representation picker and minimap in the toolbar.)
Find text and change the encoding
- Press Ctrl+F to search within the file. Press F3 to jump to the next match and Shift+F3 for the previous one.
- Tick Regular expression in the Find box to search with a pattern instead of plain text —
ERROR \d+, or^Warningfor lines that begin with it.^and$mean the start and end of a line. A pattern that will not compile is reported as such, rather than quietly finding nothing. - Very large files are searched in overlapping windows, so a single match longer than about 64 KB may be missed if it happens to straddle a window edge. Plain text search has no such limit, and neither does a pattern that matches something shorter.
- If text looks garbled, click Encoding in the toolbar (or press E) to cycle through text encodings until it reads correctly; the automatic setting usually gets it right.
- Press W to toggle word wrap for long lines.
- Press Ctrl+G to jump to a line, or to a byte offset in hex mode. It takes arithmetic across number bases, so
0x1000 + 15 + 1goes to 4112 — hexadecimal with0x,$or a trailingh, binary with0b, octal with0o, and+ - * /with parentheses. - Open a hit from Find Files with Find text filled in and the viewer starts with that search: the text is already in the find bar and the first occurrence is on screen, so you land where the match is rather than at the top of the file. Change it or clear it there and yours is the one that stays. Switch it off under Settings ▸ Edit/View if you would rather every file opened at the beginning.
Read the strings in a binary
In the hex representation the toolbar offers Strings: a panel listing every readable run of text in the file, with the offset it sits at and how it was decoded. Click a row and the hex view jumps to those bytes and selects them, so the next thing you do — Copy selection as…, or simply reading what is around it — applies to the string you clicked.
- Four readings run at once: ASCII, UTF-8, UTF-16 little-endian and UTF-16 big-endian. A Windows executable's wide strings and its plain ones therefore appear in one list, rather than needing a separate pass for each. Latin-1 is offered under Encodings as well, but is off to begin with, because three quarters of all byte values are printable Latin-1 and compiled code passes that reading in bulk.
- The same bytes are often readable in more than one encoding. Where two readings claim the same range, the one that reads most like text wins — so
Hellois listed once, and not also as the pair of ideographs those bytes spell when read two at a time. - Min. length is how short a run may be and still count. Four characters is the usual starting point; raise it on a large binary to thin the list out.
- The filter field narrows what is shown without re-reading the file, so it stays instant even on a very large one. Changing the length or the encodings does re-read it, because those change what counts as a string.
- Show unlikely strings, under Encodings, adds everything that is merely printable — including UTF-16 text that is not mostly Latin, which the ordinary list leaves out because nothing in the bytes tells it apart from ordinary text read two bytes at a time.
Zoom a picture
In the image representation the viewer opens a picture fitted to the window, and leaves a small one at its own size instead of blowing it up.
| Action | Menu | Keys |
|---|---|---|
| Zoom In | View ▸ Zoom In | Cmd++ / + |
| Zoom Out | View ▸ Zoom Out | Cmd+- / - |
| Actual Size (100%) | View ▸ Actual Size | Cmd+0 / 0 |
| Zoom to Fit | View ▸ Zoom to Fit | Cmd+9 / F |
You can also pinch on a trackpad or hold Cmd and scroll. The level is shown in the status line, and Actual Size means one image pixel per screen point — not merely “undo my zooming”. Zoom to Fit keeps following the window: resize it and the picture stays fitted.
Notes about a line
If the Notes plugin is installed, a note can be about a particular line of a file rather than about the file as a whole.
- Put the cursor on the line and choose View ▸ Note for This Line… (Cmd+Shift+N). The note editor opens with the file name and the line number in its title.
- Lines that already carry a note appear as a Notes group in the marks panel at the bottom of the window, next to any search marks. Press Cmd+Ctrl+M to open the panel; double-click an entry to jump to that line.
- The notes themselves live with all your other notes, so the notes overview and Find Files find them the same way. Deleting one is done in the note editor — the panel's close button only hides the group.
Quick View and Quick Look
Quick View shows a live preview in the panel you are not using, so you can keep browsing on one side while previewing on the other.
- Press Ctrl+Q. The inactive panel turns into a preview area.
- Move the cursor over different files in the active panel to preview each one.
- Press Ctrl+Q again, or Esc, to return the panel to a normal file list.
A picture in Quick View carries the same zoom controls as the preview in the side panel, in the corner of the panel it took over. PDFs are rendered page by page with those same zoom buttons — zoom in, zoom out, actual size, fit — and Word, OpenDocument and RTF documents are shown as formatted, selectable text. Everything else is previewed by macOS Quick Look.
For a fast full-screen preview handled by macOS itself, press Cmd+Y (Quick Look). Press Cmd+Y or Space again to close it.
The Info side panel
The side panel (View > Preview Panel, or Cmd+Shift+P) has an Info page that shows the item under the cursor the way Finder's info sidebar does.
- The preview fills the width of the panel, so widen the panel and the preview grows with it. Drag the panel's left edge to make it wider or narrower; the width is remembered.
- It is a real macOS preview, not a small thumbnail: every format Quick Look can show works here, and a multi-page document scrolls page by page inside the preview.
- A picture carries its own zoom controls in the corner of the preview — zoom out, zoom in, actual size and fit — with the current level beside them; pinching and Cmd+scroll work there too. A PDF brings the same buttons, a Word, OpenDocument or RTF document appears as formatted text, and everything else is left to Quick Look.
- Below it are the name, the kind and the size, then when the item was created and changed and which folder it is in.
Moving the cursor updates the name and details immediately; the preview itself follows a moment later, so holding an arrow key through a long folder does not start a preview for every row it passes.
Which pages the side panel offers
The side panel arrives showing Info and nothing else. Activities (transfers still running) and Log (transfers that have finished) are switched off, because most work never asks for them and a strip of three tabs otherwise sits above the preview all day.
- Switch them on in Settings > Layout, under Side panel pages; by right-clicking the tab strip; or from View > Side Panel: Info / Activities / Log.
- With one page left the panel drops its tab strip altogether, so an Info-only panel is preview and details with nothing above them.
- Every page can be switched off, Info included — worth having when you keep the terminal or a plugin view here instead. A panel with nothing left says so rather than opening blank.
- Pages a plugin contributes are not affected: those come and go with the plugin, and switching one off is what the Plugins page is for.
- View > Reset Layout puts the pages back to Info alone, along with the rest of the window's furniture.
The View menu entries matter more than they look. Once every page is switched off there is no tab strip left to right-click, so they are the way back.
Decompile Java class files
With the Java Decompiler plugin switched on, F3 on a .class file shows readable code instead of binary — including class files inside a JAR or ZIP, which you can step into and view without unpacking.
The plugin contains no decompiler of its own. It drives an engine you install, and you can swap engines at any time:
- CFR (MIT licence) and Vineflower (Apache 2.0) produce Java source. Put
cfr.jarorvineflower.jarinto the engine folder. - Procyon (Apache 2.0) is a third source decompiler.
- javap needs no download at all — it comes with any JDK, and shows bytecode rather than Java source.
Nothing is downloaded for you: these are third-party programs under their own licences, and Peach Commander neither fetches nor updates them. The viewer's Engine Folder… button opens the folder they belong in and leaves a note there naming each engine and where to get it. All of them except javap need Java installed.
Switch engines with the menu at the top of the viewer; the one you pick is used immediately and the result is kept, so comparing two engines on the same file is instant.
The source is syntax-highlighted, and two buttons take it further: Save As… writes it to a file, and Open in Editor hands it to whatever opens .java on your Mac. A very large result is shown unhighlighted so that it appears at once rather than after a pause; the status line says when that happens.
Results are cached on disk, so reopening a file you looked at before is instant; the cache is keyed by the file's size and date and by the engine's arguments, so a rebuilt class or a changed flag is decompiled again. The engine you pick is remembered per file kind. A profile can inherit from a built-in with extends = cfr and override only the flags — useful when you keep two presets of the same engine.
Turn on Compare to open a second panel with its own engine menu. Two decompilers fail in different places, so seeing them side by side is often quicker than deciding which to trust; picking javap on one side puts the bytecode next to the source. Both panels share the cache, so switching between engines you have already run is instant.
F3 on a whole .jar, .apk or .dex decompiles all of it at once and shows a package tree beside the source. The search field above the tree searches every class, which is the question a single class cannot answer: where a string, a call or a constant actually occurs, when you do not yet know which class holds it. Matches narrow the tree and the first one opens at its line. Opening a JAR with Enter still browses it as an archive — the two verbs stay separate.
There is a second, more direct route: put the cursor on a .class file or a whole archive and choose Decompile to Sources (Commands menu, the context menu, or ⌘⇧J). The classes are decompiled and the result opens in the other file panel as ordinary .java files. From there the whole file manager applies — F3 views them with Peach Commander's own Java highlighting, Alt+F7 searches across them, F5 copies them out, and you can compare or tag them like anything else. For most work this beats a window of its own, which is why the plugin's own tree can be switched off in Settings ▸ Decompiler.
A second plugin does the same for .NET: F3 on a managed .dll, .exe or .winmd shows its types as C#, Decompile Assembly to Sources (⌘⇧N) puts them in a file panel, and the search can look inside an assembly the same way. It drives ILSpy (MIT, dotnet tool install -g ilspycmd) for source, or monodis from Mono for IL — the .NET counterpart to javap. A native .dll has the same extension and no source to show, so the plugin checks before it opens and leaves those to the built-in viewer.
The settings page has a Check Engines button, and it is worth pressing: “installed” elsewhere only means the file is on disk, and a Java engine on a Mac without a JDK is present and cannot run. The check asks each engine for its version and says which ones actually work.
Android is covered too: F3 on a .dex file uses jadx (Apache 2.0, brew install jadx), which turns Dalvik bytecode back into Java. Adding it took one engine description — the same mechanism, a different format.
The plugin is off until you turn it on, in Settings ▸ Plugins — most people never open a class file, and it needs an engine to be useful.
To add an engine of your own, create decompilers.ini in the engine folder:
[myengine]
name   = My Decompiler
kinds  = class
tool   = java
args    = -jar {engine} {input}
engine  = my-decompiler.jar   ; a bare name is looked up in this folder
output  = stdout
timeout = 30                  ; seconds before the engine is stopped
{input}, {engine} and {outdir} are filled in when the engine runs. Your own entries take precedence over the built-in ones, and reusing a built-in name (cfr, vineflower, procyon, javap) replaces it rather than adding a second entry.
Shortcuts
| Action | Shortcut |
|---|---|
| View file under cursor | F3 |
| View only the file under cursor (ignore marked files) | Shift+F3 |
| Open in an external viewer | Option+F3 |
| Find within the viewer | Ctrl+F |
| Note for the line under the cursor | Cmd+Shift+N |
| Show or hide the marks panel | Cmd+Ctrl+M |
| Next / previous match | F3 / Shift+F3 |
| Quick View in the other panel | Ctrl+Q |
| Quick Look (macOS preview) | Cmd+Y |
| Close the viewer or Quick View | Esc |
Notes
- The viewer is read-only. To change a file, use the editor instead (see Editing files).
- Very large files open without delay: text opens a fast, scrollable view and the hex view streams straight from disk at any size.
- Press F3 on a folder to see a summary of its contents and total size instead of file bytes.
- The Rendered mode displays formatted content such as web pages and Markdown; hex mode shows the raw bytes side by side with their characters, which is handy for inspecting binary files.
- In Rendered mode you can select text and copy it, and Find searches the rendered page. Buttons that cannot apply to a rendered page — Format, Encoding, Mark All, Marks and Go To — are greyed out rather than doing nothing.
- The Format button re-indents structured files (JSON, XML, HTML, INI, YAML, and more when you have the matching command-line tool installed). It is described in full under Editing files, and works the same way here.