Plugins
Plugins extend Peach Commander with extra tools, file formats, and places to browse. A dozen plugins come built in, so you can start using them right away, and you can turn individual plugins on or off — or install new ones — from a single window. Use plugins when you want capabilities beyond everyday copying and browsing: visualizing what fills a disk, connecting to a WebDAV server, checking the state of a Git repository, watching system activity, and more.
Plugins come in a few flavors: some add a panel or sidebar (a view), some add columns to the file list, some add a place you navigate into like a drive, and some teach the app a new archive format. Each is enabled independently.
What the built-in plugins add
Several plugins have their own detailed help topic — follow the link for the full story:
- Disk Map — visualizes what fills a folder or volume as a treemap or sunburst, reconciled against free, purgeable, and hidden space, with a cleanup collector.
- AI Assistant — an optional, removable assistant that summarizes, renames, translates, tabulates, and tidies files in plain language, on-device or via a cloud model. Off until you switch it on, because it is in beta and can change files for you.
- Git — shows each file's working-tree status and the current branch as panel columns, and adds a Git menu for status, stage, commit, pull, and push.
- System Monitor — a live readout of CPU, memory, disk, network (and, where available, GPU, battery, sensors) in the window title bar, with click-through detail graphs.
- Task Manager — mounts your running processes as a browsable TaskManager drive; sort them, inspect them like files, or end them with Delete.
- Filesystem Images — opens a filesystem image (SquashFS, ext, Btrfs, JFFS2, UBIFS, cramfs, initramfs, FAT, exFAT, NTFS) the way an archive opens, including disk images with several partitions. Read-only, and off until you switch it on.
- Uninstaller — removes an application and the support files, caches, and preferences it leaves behind, after showing you exactly what will go.
- Docker — browses Docker containers and volumes as drives: Compose projects grouped by service, stopped containers included, and volumes as filesystems of their own. Off until you switch it on.
The remaining built-in plugins are smaller and don't need a page of their own:
- Amazon S3 — connect to Amazon S3 or S3-compatible storage (Net ▸ Amazon S3 Connect…) and browse buckets as folders, with reading, writing, renaming and deleting. Secret keys are kept in the macOS Keychain.
- WebDAV — connect to a WebDAV server (Net ▸ WebDAV Connect…) and browse, upload, download, rename, and delete on it as if it were a folder. Passwords are kept in the macOS Keychain.
- iCloud Drive — adds an iCloud Drive entry to the drive bar that jumps straight to your local iCloud Drive folder. It appears only when iCloud Drive is set up on your Mac.
- Notes — keep a note beside any file or folder. A small ● badge marks items that have one; edit notes in a docked Notes sidebar or a full rich-text editor (Commands ▸ Edit Note…), and browse them all with Notes Overview….
- Log Viewer — open a file as a color-coded, level-classified, live-tailing log (File ▸ View as Log…), with per-level filters, search, and support for common log formats plus your own regex formats. Handles multi-gigabyte logs instantly.
- Markdown and HTML — press F3 on a
.mdor.htmlfile and read it formatted instead of as source, with```mermaiddiagrams drawn and$…$mathematics typeset on your Mac. Nothing is downloaded and no part of the document is sent anywhere. - CSV Lister — press F3 on a
.csvor.tsvfile and it opens as a real table with sortable columns instead of raw text. The delimiter is detected automatically, so semicolon-separated exports line up too, and the viewer's search finds values cell by cell. - AI Column — adds an AI Language column that detects each text file's dominant language on-device (using Apple's NaturalLanguage framework — not a cloud model). Off until you switch it on, along with the assistant.
- Archive formats — teaches the app to browse and extract more archive types (7z, tar family, gzip/bzip2/xz/zstd, and RAR where a helper tool is installed), which then open like folders.
Turn plugins on or off
- Choose Configuration ▸ Plugins… to open the plugin window.
- Each installed plugin appears in the list with its name, type, and an Enabled checkbox.
- Select or clear the checkbox to enable or disable a plugin. Changes take effect immediately — enabled plugins add their menus, columns, and features; disabled ones stay out of the way.
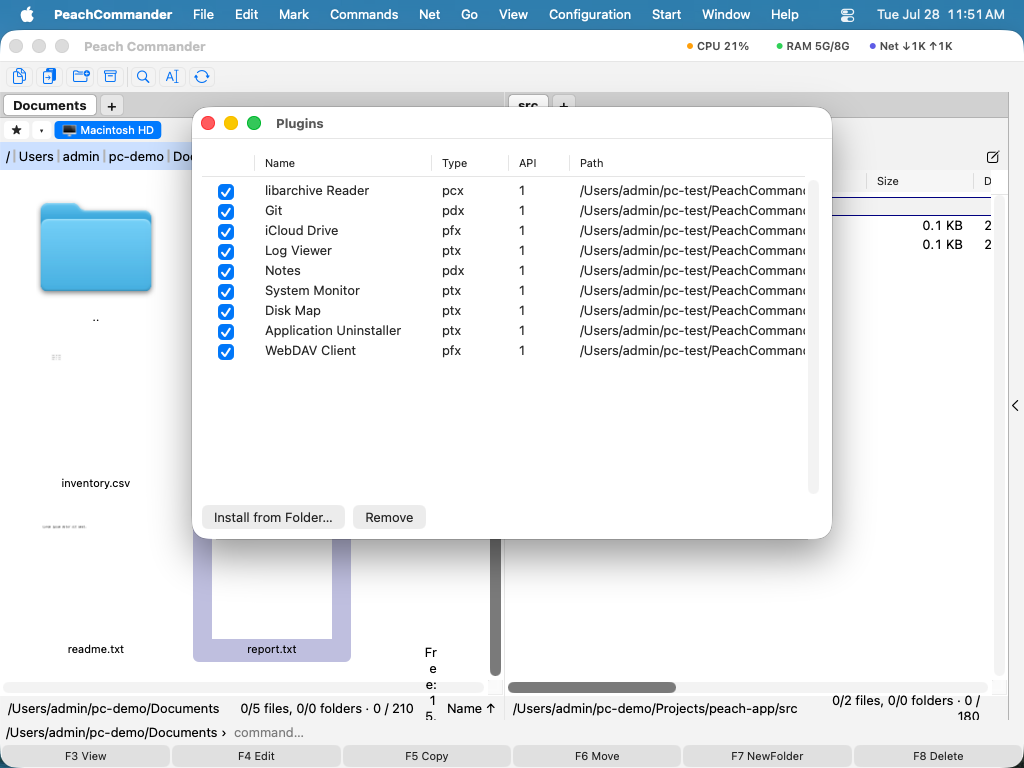 (Figure: The plugin window, where you enable, disable, install, or remove plugins.)
Install a new plugin
A plugin you download arrives as a plugin package — a file ending in .pcplug. There are four ways to install one, and they all end at the same confirmation:
- Double-click it in the Finder. Peach Commander opens and asks.
- Press Enter on it in a panel. Peach Commander is a file manager, so this is usually where the file already is.
- Drag it onto the plugin window (Configuration ▸ Plugins…).
- Choose Configuration ▸ Plugins… ▸ Install… and pick the package, a
.zipcontaining a plugin, or an unpacked plugin bundle.
Before anything is loaded, a dialog tells you the plugin's name, version, identifier and type, and which file types it will take over — a plugin that claims .iso, for example, becomes the app's reader for those files. Nothing is installed until you click Install.
If a plugin of the same identifier is already installed, the dialog says so and shows both versions, so an update reads as an update ("1.0.0 → 1.1.0") and going backwards is called out as such.
Before you install one
A plugin is a program that runs inside Peach Commander, with the same access to your files that Peach Commander has. There is no sandbox around it. Install plugins only from sources you trust, the same way you would with any other application.
Plugins downloaded from the internet arrive quarantined by macOS. Installing one tells macOS to allow it to load — which is why the confirmation dialog says so, and why it is a decision you make rather than something that happens quietly.
Remove a plugin
- In the plugin window, select the plugin in the list.
- Click Remove. Built-in features are unaffected; only the selected plugin is removed.
A plugin that came with the app cannot be deleted, so removing it switches it off instead.
Notes
- The plugin list shows each plugin's version, type and interface version alongside its name and location, so you can confirm what is installed.
- If a plugin needs a newer version of Peach Commander than you have, it is refused with a message saying so rather than failing obscurely. The same is true in the other direction: a plugin built for an older interface keeps working for as long as that interface is supported.
- Some plugins add their own columns, menu items, or panel places only while they are enabled. If a feature you expected is missing, check that its plugin is turned on here.
- Writing your own plugin, or publishing one, is covered in the developer documentation rather than here.