Tutorial: Turn what you just did into a macro
Most repetition is not one action but a small sequence of them: make a folder for this month, move the invoices into it, tag what is left. A button can run one command; a macro runs the sequence.
The shortest way to a macro is not to write one. Do the thing once, and let Peach Commander offer it back to you as steps. This tutorial walks that whole loop — record, generalize, run, put it on a key — and then opens the file to show what was written, so the hand-edited half stops being mysterious.
By the end you will have a macro built out of your own actions, working on whatever is selected rather than on the files you happened to use, sitting on a button and on a keyboard shortcut.
What a macro is not. It does not record mouse clicks, and it is not a scripting language: there are no conditions and no loops. A macro is a list of file actions you can read — which is the point, because you are asked to approve that list before it runs. For running an AppleScript or JavaScript of your own, see Automation.
What you will need
- Two folders you can safely make a mess in. This walkthrough uses
~/Downloadson the left and~/Documentson the right. - A handful of files in the left panel — a few PDFs is ideal.
Step 1 — Do it once, by hand
First, tell the app you are about to show it something: choose Configuration ▸ Macros… ▸ Record Macro…. The window steps aside, and a small panel appears saying a recording is running.
Now just do the job the ordinary way:
- Point the left panel at
~/Downloadsand the right panel at~/Documents. - Press F7 and make a folder called
2026-08on the right. - Select two or three files in the left panel with Insert (or Space).
- Press F6 to move them into
2026-08.
Watch the little panel count as you go: two steps. That is the task. Now make it repeatable.
Step 2 — Stop, and look at what was caught
Press Stop and Save… on the recording panel.
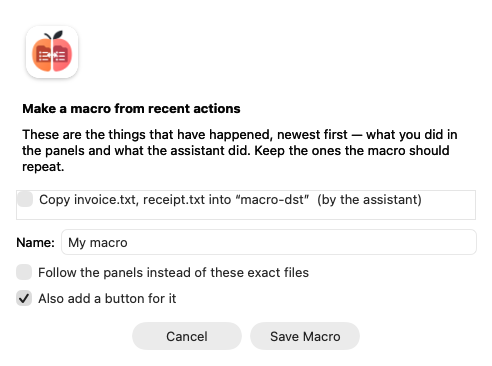 What happened between Record and Stop, offered as the steps of a new macro.
The two rows are already ticked, because you drew both ends of this yourself — untick anything that was only setting things up. Give the macro a name, say File into a dated folder.
Leave Also add a button for it switched on.
If you forgot to press Record, nothing is lost: From Recent Actions… in the same window builds the macro out of the last things that happened instead. It reads the global history, so it needs that switched on (Settings ▸ Misc ▸ Record a global history); recording does not.
Some rows will be greyed out. Packing an archive, and anything else the app records only by name, cannot be turned into a step — there is no shape for it to take. Those rows are shown with the reason rather than left out, so a list of five that offers three does not read as having missed two.
Step 3 — Make it work tomorrow, too
Do not save it yet. As recorded, the macro repeats that move: those exact files, into that exact 2026-08. Honest, and almost never what you want the second time.
Tick Follow the panels instead of these exact files.
Watch the rows change as you tick it — that is the point of the option being here rather than in a preference. "Move invoice-1.pdf, invoice-2.pdf to ~/Documents/2026-08" becomes "move what is selected to 2026-08 on the other side". The files became "the selection"; the folder became "the other panel".
Now click Save Macro. The button is in the bar.
Step 4 — Run it, and read the plan first
Select a couple of different files in the left panel and click your new button.
 Before anything runs: the steps, resolved against your panels, each one strikeable.
Two things to notice.
The rows name real files. Not move destination=%T/%{date:yyyy-MM} but "Move notes.md, report.txt into “2026-08”". The plan is resolved against the panels as they are right now, which is what makes it something you can actually check.
Striking out a step takes its dependants with it. Untick the row that creates the folder and the row that fills it switches itself off and greys out — a macro is a sequence, and moving files into a folder that was never created is not a smaller success. Tick it back on and they come back, except any you struck out yourself.
Click Run. A macro that only reads would not have asked at all.
Step 5 — Put it on a key
Your macro is a command like any other, called mc_file-into-a-dated-folder. That means it is already in the places commands live:
- Choose Configuration ▸ Edit Shortcuts….
- Search for the macro's name and select its row.
- Click Record… and press the combination you want, say Control+Shift+D.
It also appears in the Command Browser, in the button-bar editor's command picker, in your .mnu file and usercmd.ini, and to the assistant, which can run it by name. Nothing had to be taught about macros for any of that — they all read the same command table.
Step 6 — Look at what was written
Choose Configuration ▸ Macros….
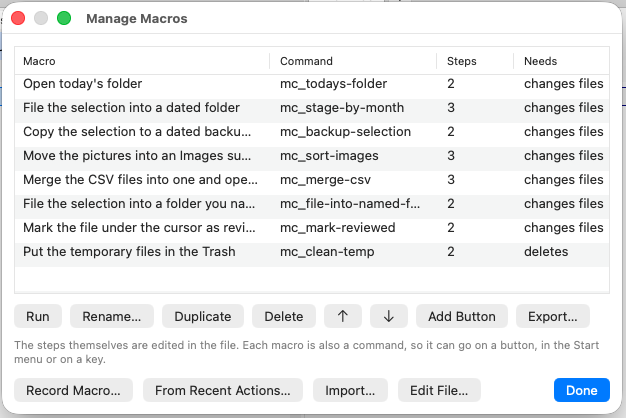 Every macro with its command name, its step count, and what it will ask permission for.
Yours is in the list, next to the eight worked examples the app seeded the first time the editor was opened. The column that matters most is the last one: what each macro will ask permission for, so "this one deletes" is visible before you put it on a key.
Run tries it right here, on the panels behind the window — the quickest way to see whether what you recorded is what you meant. It goes through the same plan and confirmation as any other run.
Export… writes it to a file of its own — that is how you send this macro to somebody, and how Import… takes theirs.
The steps themselves are not edited here. Edit File… hands over to the editor — each macro is its own macros/<id>.json, because a step is a tool name and its arguments, which is what JSON is:
{
  "id": "file-into-a-dated-folder",
  "title": "File into a dated folder",
  "steps": [
    { "tool": "make_directory", "arguments": { "path": "%T/%{date:yyyy-MM}" } },
    { "tool": "move", "arguments": { "sources": "%S", "destination": "%T/%{date:yyyy-MM}" } }
  ]
}
That is exactly what step 3 wrote for you. %T is the other panel, %S is the selection, %{date:yyyy-MM} is the date the macro started — the same placeholders the button bar and the Start menu use.
Step 7 — One thing the recorder cannot give you: asking
Change the second step's destination by hand, from a date to a question:
{ "tool": "make_directory", "arguments": { "path": "%T/%{ask:Folder name=Archive}" } },
{ "tool": "move", "arguments": { "sources": "%S", "destination": "%T/%{ask:Folder name=Archive}" } }
Save. The macros reload immediately, and a mistake — a misspelled tool, a missing argument — is reported while the editor is still open.
Run it again. You are asked for the folder name before the plan appears, and your answer is already in it: the rows say "Move the selection into “Rechnungen”", not "into whatever you are about to type". Cancelling the question cancels the macro. The same question written twice, as here, is asked once and used in both places — so the two steps cannot disagree about the folder.
Where to go from here
| You want to… | Use |
|---|---|
| Repeat a sequence of file actions | A macro — this tutorial |
| Click an icon to run one thing | A button bar button |
| A named entry in the menu bar | A Start menu command |
| Run an AppleScript or JavaScript of your own | The Scripting plugin |
A caveat worth knowing before you rely on it: undo after a macro takes back its last step, not the whole macro. Each step is logged and undone on its own, and several tools have no inverse at all — a button offering a macro-wide undo would be lying about those.
Next steps
- Macros — the full reference: every placeholder, the permission rules, and the eight shipped examples.
- Speed up repetitive actions — buttons, the Start menu, and custom shortcuts.
- Automation (AppleScript & Shortcuts) — driving Peach Commander from a script, and running your own scripts.