AI Assistant
The AI assistant is an optional, removable plugin that helps you work with your files in plain language. It can summarize or explain a document, suggest a better file name, translate or proofread text, turn data into a table, and even organize a folder — and it can carry out file actions for you after showing you a plan first. It comes as two plugins: AI On-Device runs on Apple Intelligence and gives you the actions that show a proposal and apply it, while AI Assistant is the chat and needs a cloud model. Enable either, or both. It arrives switched off. Turn it on in Configuration ▸ Plugins… and restart, or leave it off and nothing about it appears — no AI ▸ menu, no chat, no column. That is deliberate while it is in beta: it can rename, move and delete files and run shell commands for you, each behind a plan you approve, and that is a lot of reach to hand a new feature by default. Without an API key it works entirely on your Mac, so this is about the reach and not about anything leaving the machine. The AI Column plugin shows what those actions worked out — a summary, a kind, a topic, a date — as panel columns; it starts no model of its own. It arrives switched off with them and stays optional, and shows nothing until you switch it on and add one of its columns. You can also remove either one entirely from the same page.
On-device or cloud. The on-device model is private and free, and it is small: it takes in a few thousand words at a time. Reading a whole long file therefore works differently — the assistant reads it in slices and folds the results together, which takes longer the longer the file is. For heavy work across many files, or long conversations, a cloud model is faster and holds more at once. The right-click actions always run on your Mac; the chat is the half that wants an endpoint, and Settings ▸ AI is where you give it one.
Open the assistant
Choose Commands ▸ AI Assistant to show the assistant in a docked panel on the right of the window. Type a request and press Return; the assistant can read files, look things up, and — with your confirmation — make changes.
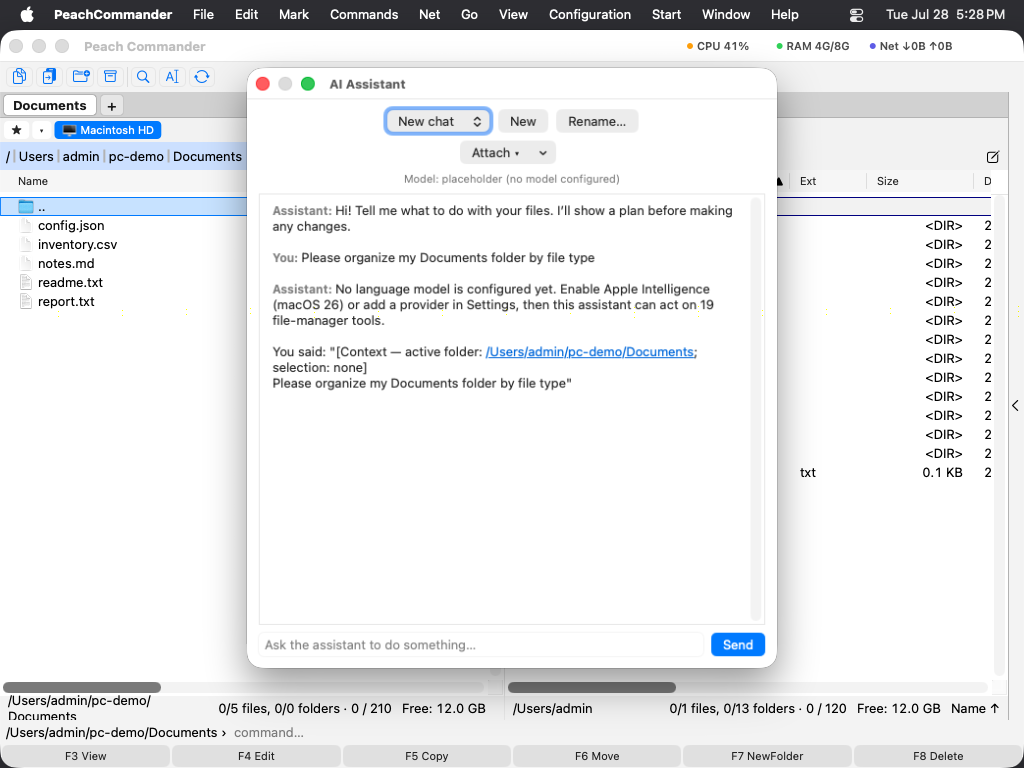 (Figure: The AI assistant, docked on the right, working on a request.)
Right-click actions (AI ▸)
The quickest way to use the assistant is the AI ▸ submenu in the right-click menu:
- On a file — Summarize, Explain, Classify, Suggest a name, Suggest a comment, Translate to English, Proofread, Detect tasks, and Make a table.
- On the panel background — Organize this folder, Find by meaning, and Find likely duplicates.
Summarize, Explain, Classify, Suggest a name, Suggest a comment, Make a table and Organize this folder come from the AI On-Device plugin and do their work without opening a chat at all — on a scan or a screenshot too, because the words are read off the picture first: they show what they propose in a sheet, you untick anything you want left alone, and nothing on disk changes until you approve it. The remaining actions belong to the AI Assistant plugin and open their own titled chat (for example, Translate – report.txt), so different tasks stay separate instead of piling into one long conversation. When you type into the input field yourself, that request continues the current chat.
Several files at once. Mark a selection and the action runs over every marked file, one after another. The actions that use a sheet show their progress in it and Cancel stops between files; the ones that open a chat put the progress in the status line, where Stop does the same. Either way you can look at the first few results and call it off.
Suggest a name ends in a button rather than a sentence: the proposed name appears in a bar under the conversation with a Rename button beside it. Pressing it is the approval — you are not asked twice. Classify ends with an offer of its own: File into folders… proposes a destination for every file it has just classified — a folder named after its kind, and a year below that when the document states a date — and moves nothing until you approve the list. Each row names the topic it found, so a kind that came out too broad is visible before anything is filed. Undo takes back one destination folder at a time.
Your own wording
What each action asks the model is a text file you can edit: aichat/skills.json for the file actions and aichat/folder-skills.json for the folder ones, in your configuration folder. Both are written out with the built-in wording the first time the assistant runs, so you can see the format. {name} and {path} stand for the file. Delete a file to go back to the built-in wording.
Actions of your own. Add an entry with an id of your choosing, and it can be run like any other command by naming plugin.ai.skill.<id> — in the user menu, on the button bar, or on a keyboard shortcut. (For a folder action, plugin.ai.folderskill.<id>.) The AI ▸ submenu itself lists the built-in actions: it is built from the plugin's manifest without loading the plugin, so that a disabled plugin contributes nothing, which is why your own actions are placed by you rather than appearing there. Name an id that does not exist and the assistant says so instead of doing nothing.
Ask it to find a file
You do not have to know where a file is. Describe it and the assistant looks it up in the index macOS already keeps of your disk — so there is nothing to build and no waiting for it to catch up.
- "Find the PDF invoice from last month" — a kind, a word in the name, and a time window.
- "Where are all my node_modules folders?" — folders, by name, anywhere in your home folder.
- "Which file mentions the Aachen contract?" — words inside files, which the ordinary Find Files search cannot do unless you point it at a folder first.
You can steer where it looks: your home folder by default, the whole computer, or just the folder a panel is showing. It tells you which of those it used, so an empty answer is readable rather than a shrug.
Two limits worth knowing. macOS keeps some places out of its index — and out of reach of any app without Full Disk Access — so "nothing found" is not proof that a file does not exist; see Troubleshooting. And a file only just created may not be indexed yet, in which case Find Files (Alt+F7), which walks folders itself, will still find it.
Manage your chats
- Use the chat switcher at the top of the panel to move between conversations.
- The Delete ▾ menu offers Delete this chat and Delete all chats, so you can clear everything at once when the list gets long. Empty chats are cleaned up automatically when you close the panel.
Changes are confirmed first
For anything that modifies files — moving, renaming, writing, deleting — the assistant shows a plan and waits for your confirmation before acting. You can change this in Settings by raising the assistant's autonomy, or lower it to read-only so it never changes anything. A copy or a move is reported as done when it is done: the assistant waits for the transfer to finish, and you can follow it in the Transfer Manager as with any other operation.
You can agree to part of a plan. When a plan covers several files — renaming a folder full of them, clearing out your Downloads — each one appears as a ticked line above the buttons. Untick the ones you want left alone and press Confirm & run: the rest goes ahead, and what you unticked is not touched. Unticking everything is the same as cancelling, and the assistant says so rather than reporting that it did nothing. A plan that is a single action has no list, because Confirm and Cancel already say yes and no to it.
What the assistant did, and taking it back
Actions ▾ in the chat has two entries:
- Show what the assistant did… lists every change, newest first, with what was asked of it and how it turned out — including attempts the autonomy setting refused. An external agent connected over MCP is in the same list.
- Undo the last change takes back the most recent change that has an inverse: a rename is renamed back, a move is moved back, and files moved to the Trash are put back where they came from — the assistant records where each one went, so it can find them again even though the Trash renames anything whose name is already taken. Nothing is written over: an item whose old path is occupied again is refused with that reason instead. Where nothing can be taken back, the list says why — an overwritten file was not kept anywhere, and a permanent deletion left nothing to restore.
You can also just ask: "undo that" and "what did you change?" reach the same two functions.
That list is also where a macro comes from: Configuration ▸ Macros… ▸ From Recent Actions… offers what the assistant just did as the steps of one you can run again, on a button or a key. What the assistant does is also caught by Record Macro…, alongside what you do by hand. See Macros.
Panel columns
What the actions worked out is available as panel columns. Add them from the column set editor: AI Summary shows the first line of a summary, and AI Kind, AI Topic and AI Date show what Classify made of a file — under those names in English, translated in every other language. Each stays empty until an action has read that file — these columns show work already done and never start the model themselves. Language in the same plugin detects the language a text file is written in, without a model at all.
The same three are rename tokens. [=ai_column.ai_topic]-[Y]-[M].[E] in the multi-rename dialog (Ctrl+M) names a folder of dokument1.pdf files by what they are: nothing was built for that, because the rename mask has always resolved [=provider.field] through the column system. Classify first, then rename. The header follows your language; the ai_column.ai_topic inside the mask does not, so a mask keeps working when you switch languages.
Settings
Open Configuration ▸ Settings ▸ AI to configure the assistant on a single page:
- Chat model — what the AI Assistant chat runs on. Since the on-device actions became their own plugin there are two answers, not three: The cloud endpoint below, when one is set, or Nothing — leave the work to the AI On-Device plugin. The page is grouped the same way, with the chat's settings first and what either half may do below them.
- Cloud endpoint, model, and API key — to use an OpenAI-compatible model instead of the on-device one. The key is stored in the macOS Keychain, never in your configuration files.
- Assistant autonomy — read-only, confirm changes (the default), or autonomous.
- Custom system prompt — optional instructions that shape how the assistant replies.
- MCP server — an optional local-only server that lets an external agent drive the app; off by default and protectable with a token.
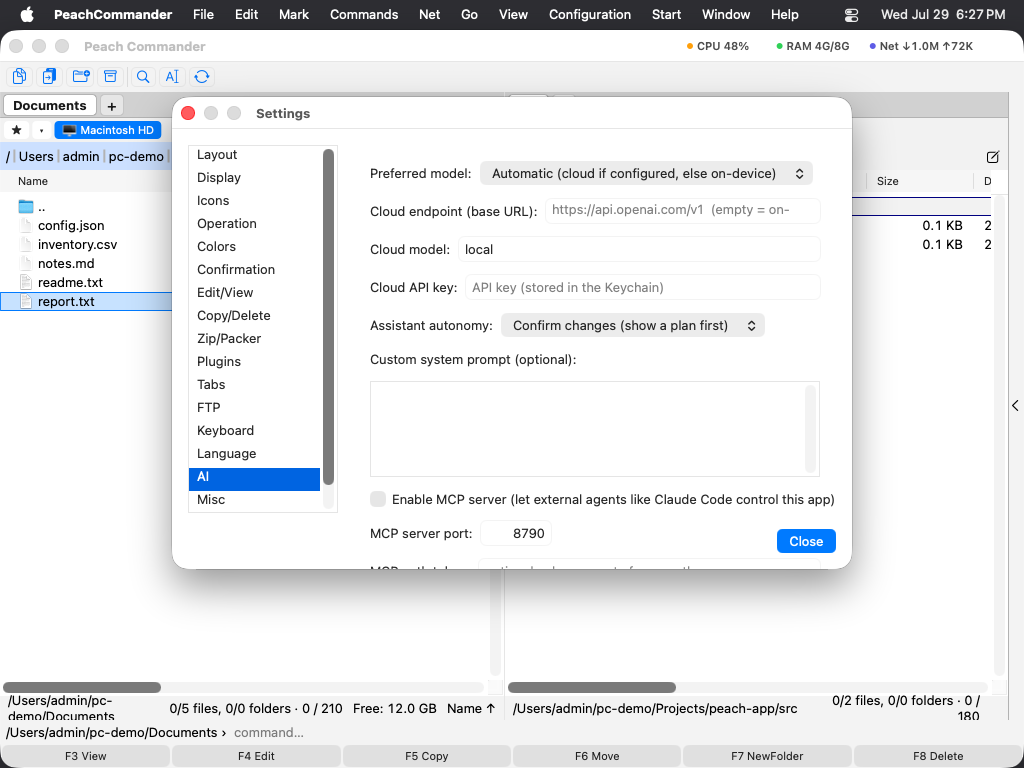 (Figure: All assistant options live on one AI page in Settings.)
Privacy
- With Apple Intelligence the assistant runs on your Mac; nothing leaves the device.
- A cloud model is used only if you configure one, and its API key is kept in the Keychain.
- File-changing actions are confirmed before they run unless you deliberately raise the autonomy level.