Tutorial: Install and use a plugin
Plugins add extra tools and places to browse to Peach Commander — things like a visual disk map, live Git status in your panels, or a connection to a WebDAV server. Several plugins ship with the app, so there is nothing to download to get started. You manage all of them from one window.
This tutorial walks you through three everyday tasks, start to finish:
- Enable a bundled plugin and use it (Disk Map).
- Turn on Git columns and read them in a panel.
- Install a plugin from a
.zipfile.
You do not need any developer knowledge. For a reference-style overview of every built-in plugin, see Plugins.
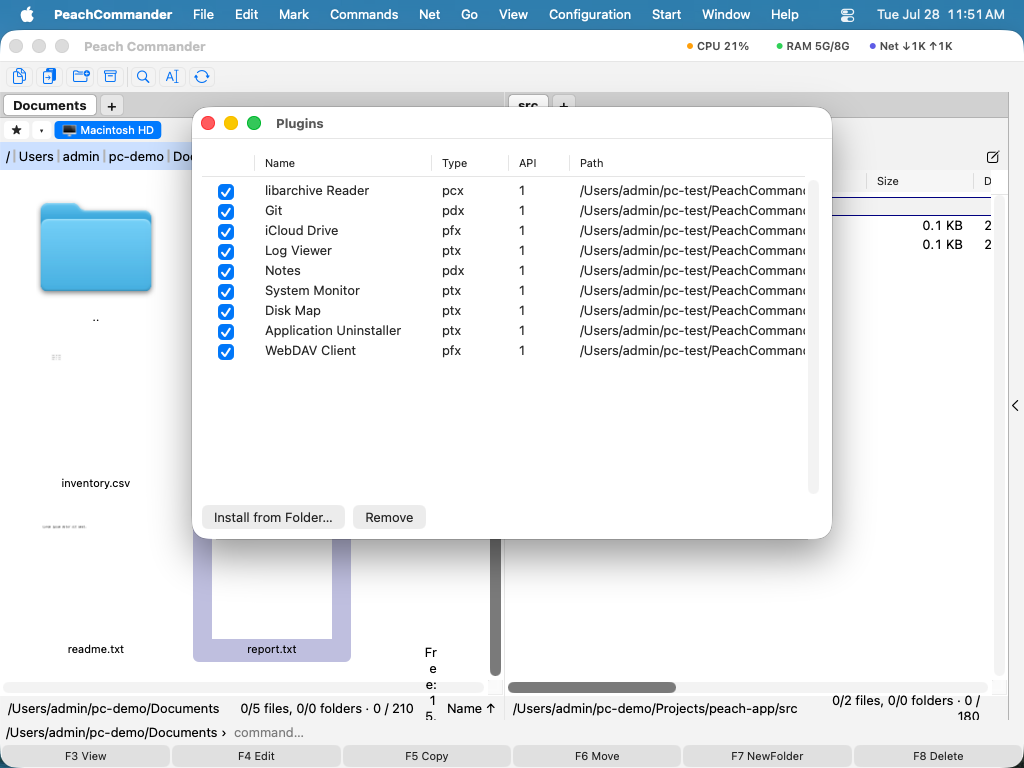 The plugin window, where you enable, disable, install, or remove plugins.
Part 1: Enable and use the Disk Map plugin
Disk Map shows a visual treemap of a folder, so you can see at a glance what is filling up space. Say your Downloads folder has quietly grown and you want to find the culprit.
Step 1 — Open the plugin window
- From the menu bar, choose Configuration ▸ Plugins….
- The window lists every installed plugin with its name, type, and an Enabled checkbox.
Step 2 — Turn on Disk Map
- Find Disk Map in the list.
- Select its Enabled checkbox. The change takes effect right away — there is no need to restart the app.
- Close the plugin window.
Step 3 — Run it on a folder
- In either panel, navigate to your Downloads folder.
- Open the Commands menu and choose the Disk Map entry the plugin added.
- A treemap appears: each file and subfolder is drawn as a rectangle sized by how much space it uses. The biggest blocks are your biggest space users.
- Hover over or click a block to see which item it is. Now you know what to clean up.
Tip: If you do not see the Disk Map command, reopen Configuration ▸ Plugins… and confirm its Enabled checkbox is still selected. Plugins only add their menus and features while they are turned on.
Part 2: Turn on Git status columns
If you work with Git repositories, the Git plugin can show each file's status right in the panel — so you can see what is modified, new, or ignored without leaving the file manager.
Step 1 — Enable the Git plugin
- Choose Configuration ▸ Plugins….
- Select the Enabled checkbox next to Git.
- Close the window.
Step 2 — Browse into a repository
- In one panel, navigate into a folder that is a Git working copy (one that contains a
.gitfolder). - The Git plugin adds a status column while you are inside the repository. Modified, untracked, and clean files are marked so you can tell them apart at a glance.
Step 3 — Read the status while you work
- Copy, move, or edit files as usual (see Copying files). The status updates as the contents of the folder change.
- Leave the repository and the extra column steps aside on its own — the plugin only surfaces status where it is relevant.
Some plugins add columns, menu items, or panel places only while they are enabled. If a column you expected is missing, first check that its plugin is turned on in Configuration ▸ Plugins….
Part 3: Install a plugin from a .zip
You can add plugins that did not ship with the app. They usually arrive as a plugin bundle or a .zip file that contains one.
Step 1 — Save the file somewhere you can find it
Download or copy the plugin .zip to a known location, such as your Downloads folder. You do not need to unzip it yourself — Peach Commander can read the .zip directly.
Step 2 — Install it
- Choose Configuration ▸ Plugins….
- Click Install from Folder….
- In the file chooser, select the plugin bundle or the
.zipthat contains it, then confirm. - The plugin appears in the list and is enabled automatically.
Step 3 — Confirm and use it
- Check that the new plugin shows in the list with its name, type, and interface version. This confirms the app recognized it.
- Use whatever it adds — a new command in the Commands menu, an extra column, a new place to browse, or a viewer — just as you did with the bundled plugins above.
Removing a plugin
If you no longer want a plugin — whether bundled or installed:
- Choose Configuration ▸ Plugins….
- Select the plugin in the list.
- Click Remove. Only that plugin is affected; the rest of the app is unchanged.
You can also leave a plugin installed but simply clear its Enabled checkbox to switch it off temporarily.
Troubleshooting
- A plugin's feature is missing. Reopen Configuration ▸ Plugins… and confirm the plugin's Enabled checkbox is selected. Many plugins only add their menus, columns, or panel places while enabled.
- The plugin window is empty. If no plugins are installed, the window shows a short prompt pointing you to Install from Folder….
- A downloaded plugin will not install. Make sure you pointed the file chooser at the plugin bundle itself, or at a
.zipthat contains one.
Peach Commander is pre-1.0 software, so the exact set of bundled plugins and the details of what each one adds may change between preview builds.
Next steps
- Plugins — the full list of built-in plugins and what each one does.